Python Plugins
AlliGator supports user-provided Python functions which appear as right-click menu items for the corresponding object or main AlliGator Analysis menu.
Currently, only two objects support plugins: the Decay Graph and the
Source Image. In addition, FLI Dataset plugins are supported as sub-menus of
the Analysis:FLI Dataset menu. Future versions will support plugins for all
objects, as needs arise.
Since objects have associated menus (sometimes empty) in the Analysis menu,
plugins can also be inserted in the Analysis:Decay Graph and
Analysis:Source Image menus. However this does not always make sense, for
instance when a plugin requires the information of the mouse right-click
location.
This page does not describe how to develop Python plugins for AlliGator, but provides an overview of the design principle, followed by a description of the mandatory features for a plugin. The last section show an example of plugin for the Decay Graph graph. Example of plugins for the different supported objects can be found in the example scripts provided by default with AlliGator.
Details on how to implement an AlliGator Python plugin can be found in the AlliGator Python Plugins API page. In particular, a section describes the recommended way to publish and document a plugin in a dedicated GitHub repository.
Design Principle
LabVIEW has some basic built-in support for communication with Python in the form of the Python Node. The Python Node requires spawning an instance of Python (the path and version of which can be specified by the user in the Settings:Plugins window), which is done when AlliGator starts, and passing it a script path and function name within that script, together with parameters. The functions then returns a result or possibly an error code and message, in which case this is displayed in the Notebook window.
The type of data that is passed to a plugin function is in part specified in the function’s body using AlliGator plugin ‘statements’ (described in subsequent sections), but some of the data also depends on the target of that plugin and does not need to be specified within the function (in other words, it is handled automatically).
For instance, a plugin for the Decay Graph will always pass a list of plots
to the function (the so-called graph_data_in), the content of which depends
on whether the plugin acts on all plots, selected plots or only the plot from
which the function was invoked.
The exact nature of the default data passed to a function is described in the AlliGator Python Plugins API page.
The non-default data passed to the function is specified by the developer in the Input Parameters Definition section, and is passed to the Plugin function as a dictionary (see below and AlliGator Python Plugins API page for details). Some of this data is provided by the user in a dialog window, which is automatically opened by AlliGator before executing the plugin function (if needed).
The rest is plugin-requested internal AlliGator parameters and/or data and does not require user input.
The data returned by the function is, as the input data, separated into two parts: the default data type for the function’s target, and the plugin-specific data, specified by the user in an AlliGator Output Value Type & Destination section. As the input parameters specified in the Input Parameters Definition section, it is passed as a dictionary (see below and AlliGator Python Plugins API page for details).
As for the default input data, the default output data depends on the function’s target and is described in the AlliGator Python Plugins API page.
Both input and output definition sections are discussed below.
Python Plugins Folder
Python plugins consists of functions saved within Python script files (files
with a .py extension).
These script files need to be saved within the Python Plugins folder
located in the AlliGator installation folder (generally in
C:Users\User_Name\AppData\Local\AlliGator, unless specified otherwise during
installation.
Each file can be saved within a subfolder hierarchy within the Python Plugins Folder.
Python Plugin Files
Each .py plugin file will give its name to a submenu in the right-click menu of
the object it is targeting (see below to learn how to specify a plugin’s target)
or the Analysis submenu it is added to (same remark). For instance, if a
script file name UCLA_Plot_Functions.py is added and targeted to the
Decay Graph, the functions within will be added to the Decay Graph
context menu in a submenu named UCLA Plot Functions.
For instance, if there are two files in the Python Plugins folder named
plugins 1.py and plugins 2.py, both targeted to the Decay Graph,
two submenus will be added to the right-click menu of the Decay Graph,
respectively called plugins 1 and plugins 2.
If a submenu already exists, the plugin functions within the .py file will be added to it.
If a function with the same name already exists within the submenu, it will be added with the same name, but will be recognized as distinct by AlliGator. Because that could be confusing for a user, it is recommended to name .py files (and thus plugin submenus) in a way that is fairly unique, for instance by including a lab name in it (as in the example above).
Each plugin submenu is separated from the previous one by an horizontal divider line.
Each plugin file can contain an arbitrary number of Python functions, with valid names for Python, say function_1, function_2,…, function_n. The resulting submenu will contain as many items as there are functions, their names being the names of the functions. For instance, if plugins_1.py contains n functions: function_1, function_2,…, function_n, the corresponding submenu will look like:
plugins 1
function 1
function 2
…
function n
The next section will describe naming conventions for plugin functions, and how to distinguish them from helper functions.
Plugin Function Names
Plugin functions appear in their corresponding submenus as they are named in the script file, with the following transformations:
a single underscore at the beginning of the function name is interpreted as meaning that an horizontal separator will precede that function in the menu.
double underscores are alternatively replaced by a left and right parenthesis , respectively preceded and followed by a space.
single underscores are replaced by single spaces.
For instance, a function named this_is_a_simple_function(*args, **kparams)
will appear as this is a simple function in the submenu.
Likewise, a function named simple_operation__selected_plots__(*args,**kparams)
will appear as simple operation (selected plots) in the submenu.
Plugin Functions Special Syntax
Plugin functions need to contain some simple additional syntax to be usable by
AlliGator. The additional elements appear within comments bracketed between
triple hash tags (###) and should therefore not interfere with any
Python-specific syntax.
These syntaxic elements are as follows:
importstatementsAPI version
Destination
Plugin Flag
Input Parameters Definition
Output Value Type & Destination
A plugin function may require special modules to perform its operations. These are typically imported at the beginning of the script. In addition to any plugin-specific module import statement, any AlliGator Python Plugin script requires the following additional two import statements:
import json
import alligator
The first is used to convert the input parameters string from JSON to a
dictionary, and the output parameters dictionary to a JSON string, while the
second refers to the alligator.py script provided in the Python Plugins
folder [1], and contains type definitions that are useful to format input and
output data for a plugin.
In addition to these two import statements, the other 5 elements to include are briefly reviewed next.
The first element specifies which API version the plugin has been written for.
The second element (Destination) tells AlliGator where the plugin functions need to be inserted (in which menu or object’s context menu). This is common to all functions in the script, therefore if plugins for different targets are developed (e.g. one function for the Decay Graph, and another for the Source Image), they will need to be in different script files.
The third element (Plugin Flag) specifies whether the function is actually a plugin function or an helper function (in other words, helper functions are unmodified Python functions and do not need any of the modifications discussed here).
The fourth element (Input Parameters Definition) is used to inform AlliGator about the parameters needed by the function (some parameters are passed by default, depending on the function’s target, as discussed below). If no parameter is needed, this section can be ignored.
The last element (Output Value Type & Destination) is used by AlliGator to decide where to send the function’s output. If no output is returned, this section can be ignored.
The syntax of these different elements is discussed in the following sections.
API Version
The API version n is specified by the following triple-commented statement:
### AlliGator Python Plugin API Version = n ###
Destination
To instruct AlliGator to insert a script’s functions into a specific menu, the following statement needs to be inserted before the different functions:
### AlliGatorTarget = AlliGator/Object/Object_Name ###
and/or
### AlliGatorTarget = AlliGator/Menu/Object_Name ###
where Object_Name is the name of the target (e.g. Decay Graph,
Source Image or FLI Dataset).
For instance, to insert all plugin functions within a script into the
Analysis:Decay Graph menu, the following statement will be needed:
### AlliGatorTarget = AlliGator/Menu/Decay_Graph ###
Plugin Flag
To tell AlliGator that the function is a Plugin function, the following statement needs to be included after the doc string (if a doc string is provided) and before the Input Parameters Definition statement:
### IsAlliGatorPythonPlugin ###
If a function does not contain this statement, it will not be included in any AlliGator menu and will therefore be invisible to an AlliGator user. This will typically be the case of helper functions called by the Plugin functions.
Input Parameters Definition
Some plugins do not require any input parameters. For instance, if a Decay Graph plugin computes the mean of a plot, the only required input is the plot itself, which would be passed automatically as default data for a Graph plugin (see Python Plugins API). In that case, the remainder of this section can be ignored.
Other plugins will require either user input parameters (e.g. a scaling factor) or AlliGator parameters (e.g. the phasor frequency). Both types of parameters are declared at the beginning of the function in a custom comment section with the general structure shown below.
### AlliGator Input Parameters Definitions ###
### parameter_1:type_1 # description 1
...
### parameter_n:type_n # description n
### End of AlliGator Input Parameters Definitions ###
The first and last line of this (triple) commented section are used by AlliGator to find it and should be reproduced as shown above.
Single (or double) commented lines (or empty lines) in between these two lines will be ignored.
Input parameter declarations follow the model indicated above, that is, a triple
comment symbol (###) followed by a single parameter declaration per line.
A parameter declaration consists of a unique name (at least in a given function)
, followed by a semicolon, followed by the parameter type (from the limited
list of supported types (see Python Plugins API for details), including AlliGator, which
indicates an internal AlliGator parameter. For a user-provided input parameter,
a short description is recommended and should be provided as a single
commented string (# description n being replaced by something more…
descriptive!). It will appear next to the name and value of the parameter in a
dialog box when the plugin is called. An example of such a dialog box
(corresponding to the example shown at the bottom of this page) is provided
below.
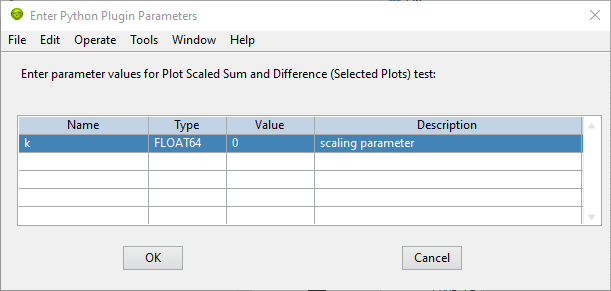
AlliGator Python Pugin Input Parameters Dialog
To expose which internal AlliGator parameters can be passed as input parameters, use the Send button in the Settings:Plugins panel. This will copy a list of these parameters in the clipboard, which can then be pasted in any text editor.
Check the Parameter Names only checkbox in the Settings:Plugins panel to get a JSON-formatted list of exposed internal AlliGator parameters without their current value.
As mentioned before, if no input parameter is needed by the function, this section can be omitted.
Output Value Type & Destination
Python plugins ouputs are of four general kinds (for details, see Python Plugins API):
error code
output message
output sent to internal AlliGator variables
output sent to objects
Error codes are internal to LabVIEW and will be formatted and sent to the
Notebook if the Verbose Error Mode setting is on
(Settings:Miscellaneous). Errors are generated by the Python script and are
in general useful to debug a plugin. For this reason, it is recommended to turn
on Verbose Error Mode when developing and testing a plugin.
The output message is an optional string generated by the plugin function. It is sent to the Notebook, and can therefore be used to display formatted results or information about the plugin’s action (including a non-Python error message).
Output sent to internal AlliGator variables are a way to modify the internal state of AlliGator as a result of executing a Plugin. For instance, a plugin could be change a Settings flag, or the phasor frequency. Use with moderation, as this could have unintended consequences if done improperly.
All previous three types of output do not require any special syntax to be added to the plugin.
The only type of output parameter that requires inclusion of an Output Value Type & Destination comment section are values destined to one of AlliGator’s displayed objects (Graph and Image). The syntax of this section, which should follow the Input Parameters Definition comment section is as follows:
### AlliGator Output Value Type & Destination ###
### value_type:destination
### End of AlliGator Output Value Type & Destination ###
The first and last line of this (triple) commented section are used by AlliGator to find it and should be reproduced as shown above.
Single (or double) commented lines (or empty lines) in between these two lines will be ignored.
Output value and destination statements follow the model indicated above, that
is, a triple comment symbol (###) followed a single declaration per line.
Valid value_type are specified in the Python Plugins API page.
Valid destination statements depend on the value_type and the plugin’s
declared destination (so for instance, a plots value type cannot be sent to
an image destination such as Mask Image but could be sent to
Decay Graph).
If no output needs to be sent to a displayed object, this section can be omitted.
To better understand these different syntactic elements and how they fit into a
Python function used as a plugin, it is easiest to look at the (not very useful
as an AlliGator plugin) example installed with AlliGator and appearing as
submenu item of Analysis:Decay Graph and as a context menu item of the
Decay Graph.
Footnotes
Decay Graph example
The following example illustrates the principles outlined above. The same example with additional comments is installed in the Plugins Folder by default.
# Decay_Graph_Plugin_Example.py
# Example AlliGator Decay Graph Python Plugin
# Tested with AlliGator version 1.02
# Author: X. Michalet
# Last modified: 2025-06-19

# The following (triple) comment is needed to specify the AlliGator Python
# Plugin API version number to use

### AlliGator Python Plugin API Version = 1 ###

# The following (triple) comment is needed to tell AlliGator where to
# insert the plugin function(s) as menu item(s)
# the syntax after the AlliGatorTarget = keyword is:
# Window/Type_of_Destination/Destination
# where 'Window' is the target AlliGator window, # 'Type_of_Destination' is
# 'Object' or 'Menu', and 'Destination' is the name of the object,
# or the menu item under which to insert the script's functions as
# 'script_name>>plugin function'
# A single insertion point per window and per object is supported

### AlliGatorTarget = AlliGator/Object/Decay Graph ###
### AlliGatorTarget = AlliGator/Menu/Decay Graph ###

# The following modules are needed to interpret incoming data and send outputs

import json
import alligator

# The double underscores in the function name below will be replaced
# by alternating parentheses in the AlliGator menu (with end spaces trimmed).
# To indicate that the function acts on all selected plots in the graph,
# the function name needs to contain 'Selected_Plots' as part of it.
# To indicate that the function acts on all plots in the graph, the function
# name needs to contain 'All_Plots' as part of it (case non sensitive).
# Otherwise, the function is assumed to act on the right-click selected plot.

def Plot_Scaled_Sum_and_Difference__Selected_Plots__test(
        graph_data_in, params_in_json, addtl_params_out_json_list):

    """Scaled Sum & Difference:

    Acts on the first two selected plots
    Expects one float parameter (k: float64)
    The resulting k*Sum and k*Difference plots are added to the Decay Graph
    """
    # The following (triple) comment indicates that this function is a plugin
    # This is to distinguish it from accessory functions that should
    # not be imported in AlliGator's menus

    ### IsAlliGatorPythonPlugin ###

    # The following (triple commented) section describes which
    # additional parameters are required for that function.
    # If no parameter is needed this section can be ignored

    ### AlliGator Input Parameters Definitions ###
    ### k:float64 # scaling parameter

    ### Phasor Frequency:AlliGator # This is not visible to the user
    ### End of AlliGator Input Parameters Definitions ###

    # The following (triple commented) section is mandatory to know which
    # type of output this function returns and which AlliGator
    # object they are destined to

    ### AlliGator Output Value Type & Destination ###
    ### Plots:Decay Graph          # comments are OK
    ### End of AlliGator Output Value Type & Destination ###

    message = 'Scaled Sum of Selected Plots and Phasor Frequency Update'
    exception_type = "None"     # could also be "Warning" or "Error"
    exception_message = ""      # provide verbose information for error

    # decode the parameter string

    params = json.loads(params_in_json)
    k = params['k']
    f = params['Phasor Frequency']

    # decode the graph data named tuple
    # the graph data comprises a list of Plot Data
    # Each Plot Data is a named tuple comprised of
    # a 'Plot_Name' (string)
    # and two lists of double, 'X_Array' and 'Y_Array'

    graph_name = graph_data_in.Graph_Name
    plots = graph_data_in.Plots
    nplots = len(plots)

    # Adds and subtracts the first 2 plots if they have the same length
    # otherwise returns an error

    if nplots < 2:
        exception_type = "Error"
        exception_message = "Not enough selected plots!"
        graph_data_out = alligator.graph_plugin_data(
            Graph_Name = graph_name,
            Plots = [],
            Reference_Decay = alligator.empty_plot)
    else:
        plot_data1 = plots[0]
        name1 = plot_data1.Plot_Name
        x1 = plot_data1.X_Array
        y1 = plot_data1.Y_Array
        plot_data2 = plots[1]
        name2 = plot_data2.Plot_Name
        x2 = plot_data2.X_Array
        y2 = plot_data2.Y_Array

        # we also requested the Reference Decay, which is an internal data,
        # not a 'parameter'. It is therefore passed as part of the graph_data_in
        # named tuple. If it is not requested, that part of the named tuple will
        # obviously be empty.
        # Other such internal data may be added to graph_data_in in future versions
        # in a (hopefully) backward compatible way.
        # Note that this function DOES NOT use the Reference Decay (aka IRF).
        # This is just to show how to request it and get to the data

        ref_decay_data = graph_data_in.Reference_Decay
        ref_decay_name = ref_decay_data.Plot_Name
        ref_decay_x = ref_decay_data.X_Array
        ref_decay_y = ref_decay_data.Y_Array

        # processing of the incoming data

        if (len(x1) != len(x2)):
            exception_type = "Error"
            exception_message = "Plots do not have the same length!"
            plots_out = []
        else:
            sumy = []
            for i in range(len(y1)):
                sumy.append(y2[i] + y1[i])
            diffy = []
            for i in range(len(y1)):
                diffy.append(y2[i] - y1[i])

            # we need to repackage those plots into a list of named tuples
            # (same structure as the input)

            plot_data1_out = alligator.plot_plugin_data(
                Plot_Name = 'Scaled Sum of Plots',
                X_Array = x1,
                Y_Array = sumy
            )
            plot_data2_out = alligator.plot_plugin_data(
                Plot_Name = 'Scaled Difference of Plots',
                X_Array = x1,
                Y_Array = diffy
            )
            plots_out = [plot_data1_out, plot_data2_out]
            message = 'Scaled Sum of Selected Plots (scaling factor: ' +\
                str(k) + ', '+name1 + ', '+name2+') and Phasor Frequency Update'
        graph_data_out = alligator.graph_plugin_data(
            Graph_Name = graph_name,
            Plots = plots_out,
            Reference_Decay = alligator.empty_plot)

        # Finally, we can send back information on the function outcome
        # and can also set AlliGator Parameters
        # all this packaged in a dictionary, converted to json and
        # appended to the (generally) empty string list
        # addtl_params_out_json_list
        # Note: space and case are irrelevant in the item names

    info_out_dict = {
    "Notebook Message" : message,
    "Exception Type" : exception_type,
    "Exception Message" : exception_message,
    "AlliGator:Phasor Frequency" : f # example of internal parameter update
    }

    # conversion to JSON string and string is appended to the incoming
    # addtl_params_out_json_list (which is empty in this example)
    # Note that AlliGator will ignore everything but the last string in the list

    addtl_params_out_json_list.append(json.dumps(info_out_dict))

    # return results to AlliGator

    return(graph_data_out)

    # Note: it is possible to send debug messages to the Python Console
    # using the standard print() statement